Get started with the Relume Publish to Webflow skill
By the end of this doc, you'll be able to:
- Understand what the Relume Publish to Webflow skill builds for you
- Set up a Webflow site from the Relume Style Guide
- Connect the Webflow MCP and the Relume Publish MCP to your AI tool
- Hand your Relume project to your AI with one prompt
- Read the report and tidy up the rebuild
Overview
The Relume Publish to Webflow skill rebuilds your published Relume project in Webflow, the Client-First way. It comes with the Relume Publish MCP, so there's nothing extra to install. Like the MCP, it's available on paid Relume plans only, so it won't work on the Free plan or during a free trial. Four steps give your AI tool what it needs: set up a Webflow site, connect two MCPs, then hand it your project.
You get a real Webflow site
Every page is built from native Designer elements with real classes and breakpoints. It isn't an embed block or a pasted chunk of code, so you, your teammates or your client can open the Designer afterwards and work on it like any other Webflow site.
The skill builds to the Finsweet Client-First convention, the class naming system most Webflow teams already use. That means an experienced Webflow developer can pick up the project straight away.
This is different from Relume Export. Export is a set of apps, such as the Relume Webflow app and the Relume Figma plugin, that bring your Relume screens into those tools. This skill reads your whole published site and rebuilds it inside Webflow for you.
Before You Begin
Before getting started, make sure you have:
- An AI tool that supports MCP connectors, such as Claude, ChatGPT, Claude Code or Codex. This doc shows the steps for Claude, which also covers Claude Code.
- A paid Relume plan with access to Relume Publish. The Relume Publish MCP doesn't work on the Free plan or during a free trial.
- A Relume project you can publish. Your AI rebuilds from the live site, and it never publishes your project for you.
- A Webflow account with a workspace you can create sites in.
Note: The skill rebuilds what's already there. It doesn't redesign. If you want design changes, make them in Relume and republish before you start, or ask for them as a separate request once the rebuild is done.
Step 1: Set up your Webflow project
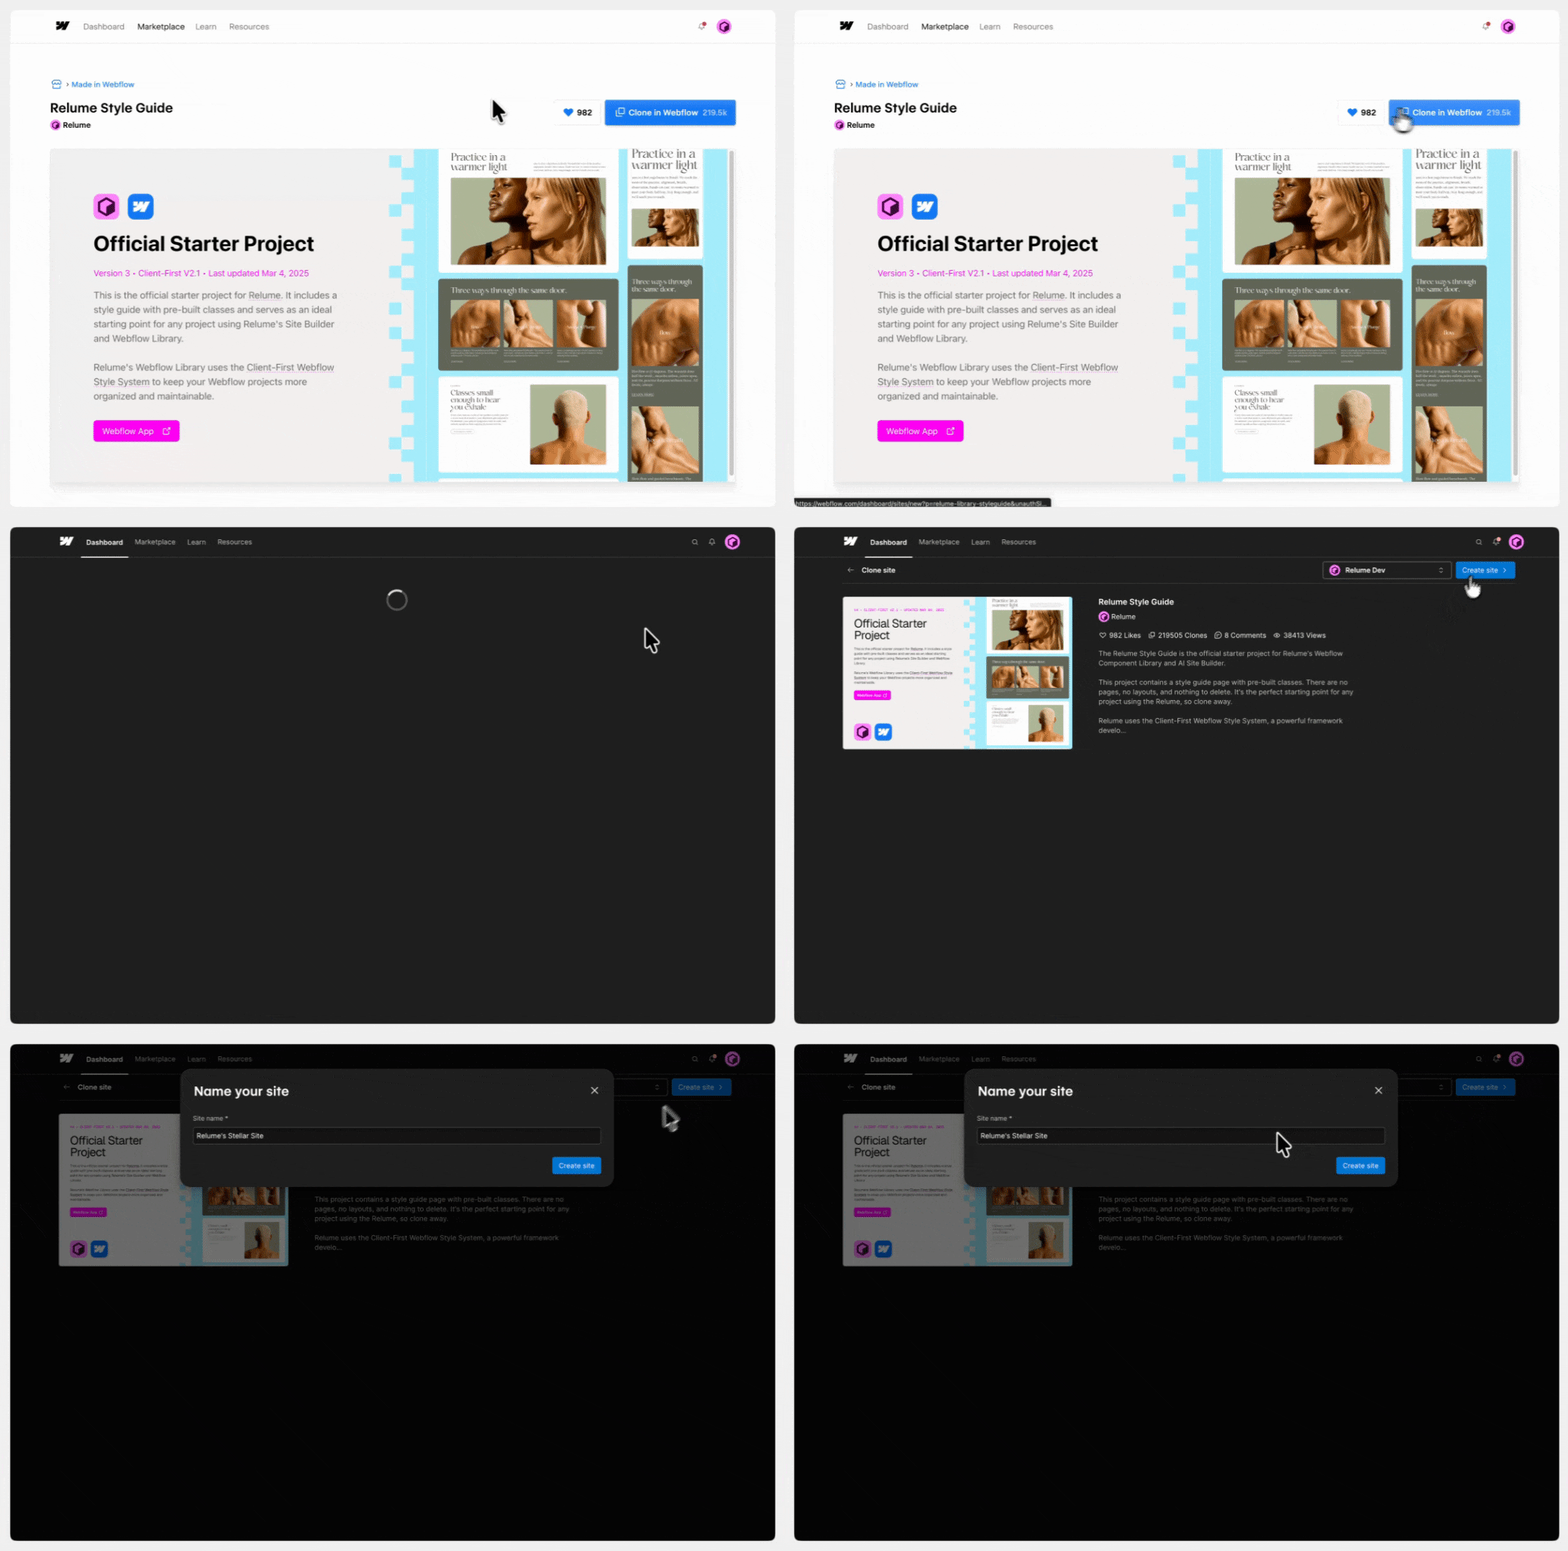
Your Webflow site needs to start from the Relume Style Guide. It carries the Client-First utilities, type scale and color schemes the build reuses, so nothing is reinvented and the result reads as Client-First to any Webflow developer.
- Open the Relume Style Guide on Webflow.
- Click Clone in Webflow.
- Choose your workspace from the dropdown next to Create site.
- Click Create site.
- Give the site a name you'll recognize. You'll use it in your prompt in Step 4.
Note: Leave the new site empty. Don't add pages or content before the rebuild.
Step 2: Connect the Webflow MCP to that site
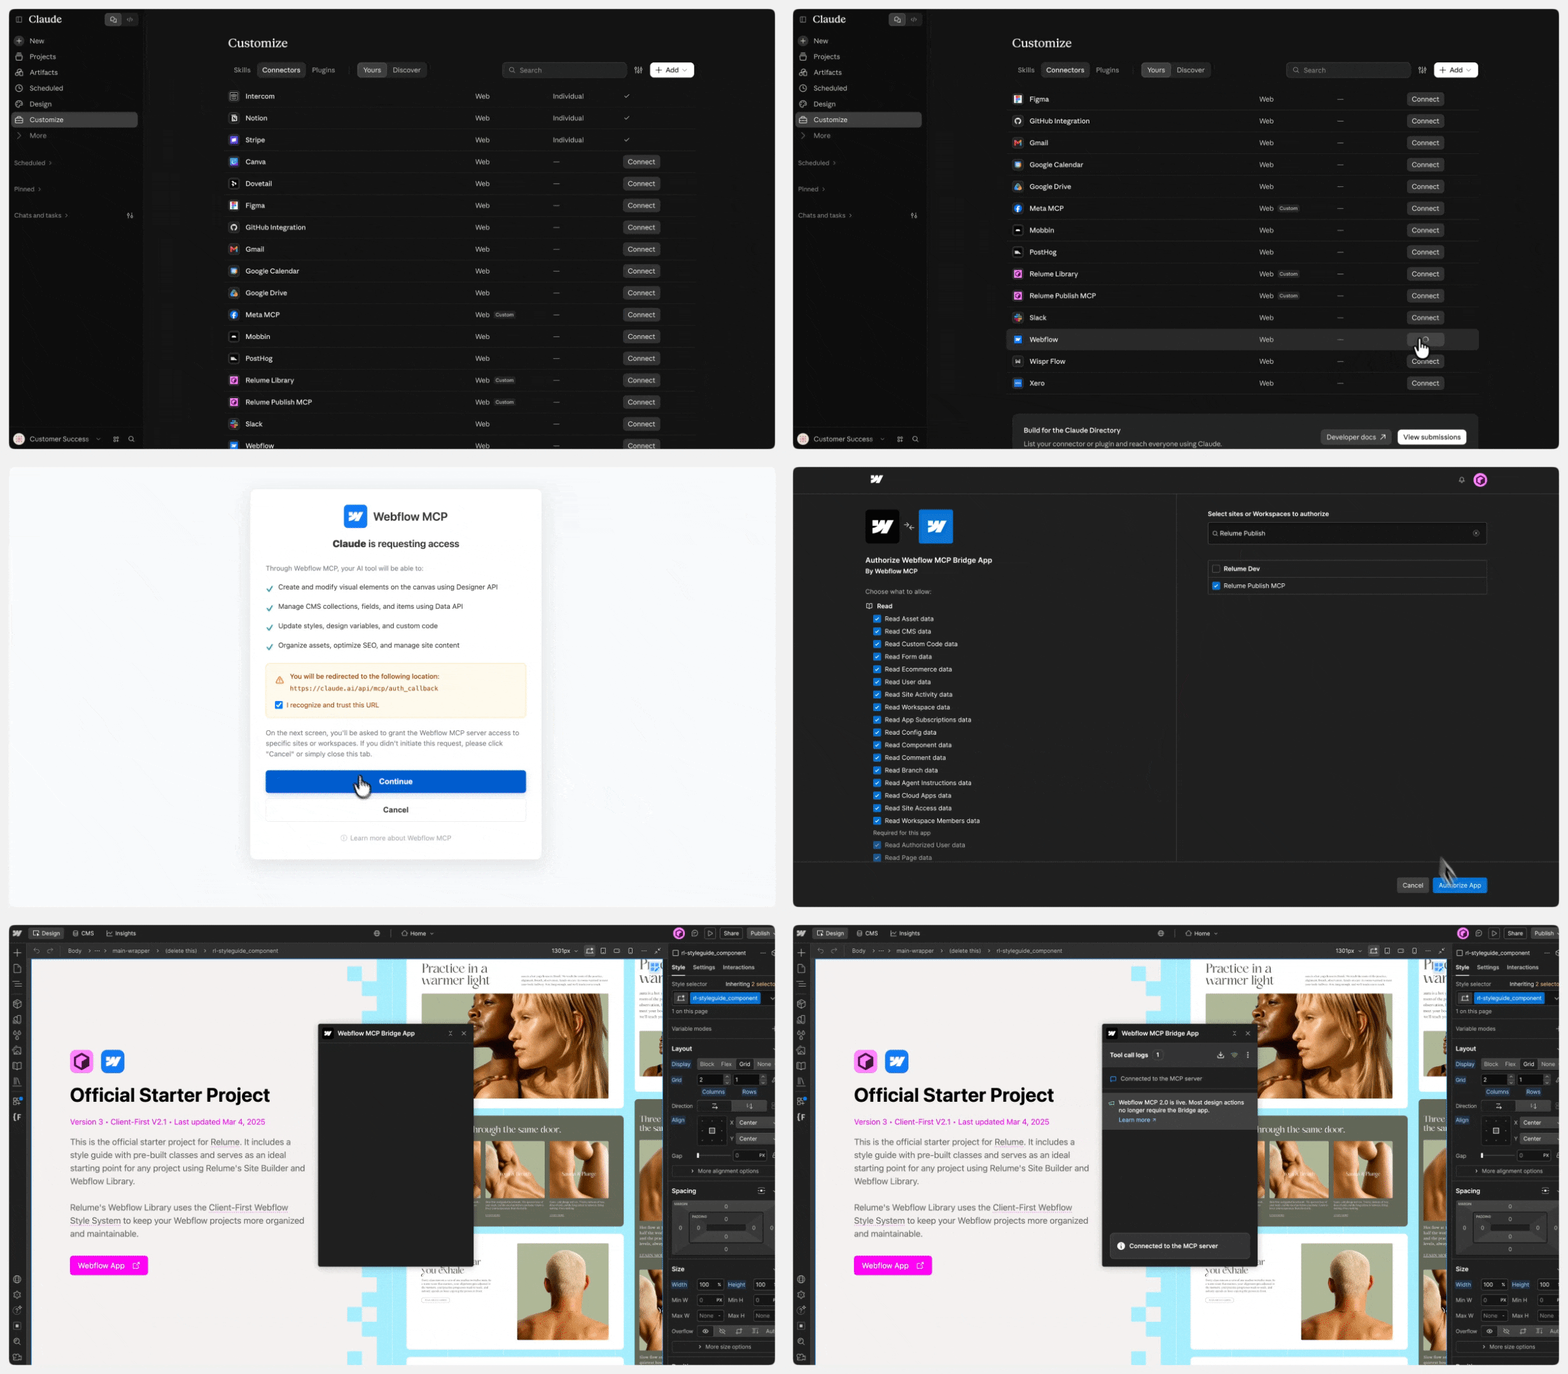
An MCP (Model Context Protocol) server is a standard way for an AI tool to use another product's features. The Webflow MCP gives your AI tool access to the site you just created. Your AI builds into the site you choose here, so make sure it's the only one selected.
Claude
Connectors you add here work on claude.ai, in the Claude desktop app and in Claude Code, as long as you're signed in with the same Claude account.
- Go to Customize, then Connectors.
- Search for Webflow.
- Click Connect.
- Sign in to your Webflow account in the window that opens.
- Under Select sites or Workspaces to authorize, select only the site you created in Step 1.
- Click Authorize App.
Claude Code with an API key
If you sign in to Claude Code with an Anthropic API key instead of a Claude account, add the Webflow MCP from your terminal:
- Run
claude mcp add --transport http webflow https://mcp.webflow.com/mcpin your terminal. - Run
claudeto start Claude Code. - Type
/mcp. - Select webflow.
- Choose Authenticate.
- Sign in to your Webflow account in the browser window that opens.
- Under Select sites or Workspaces to authorize, select only the site you created in Step 1.
- Click Authorize App.
For other AI tools, see Webflow's MCP docs.
Step 3: Connect the Relume Publish MCP
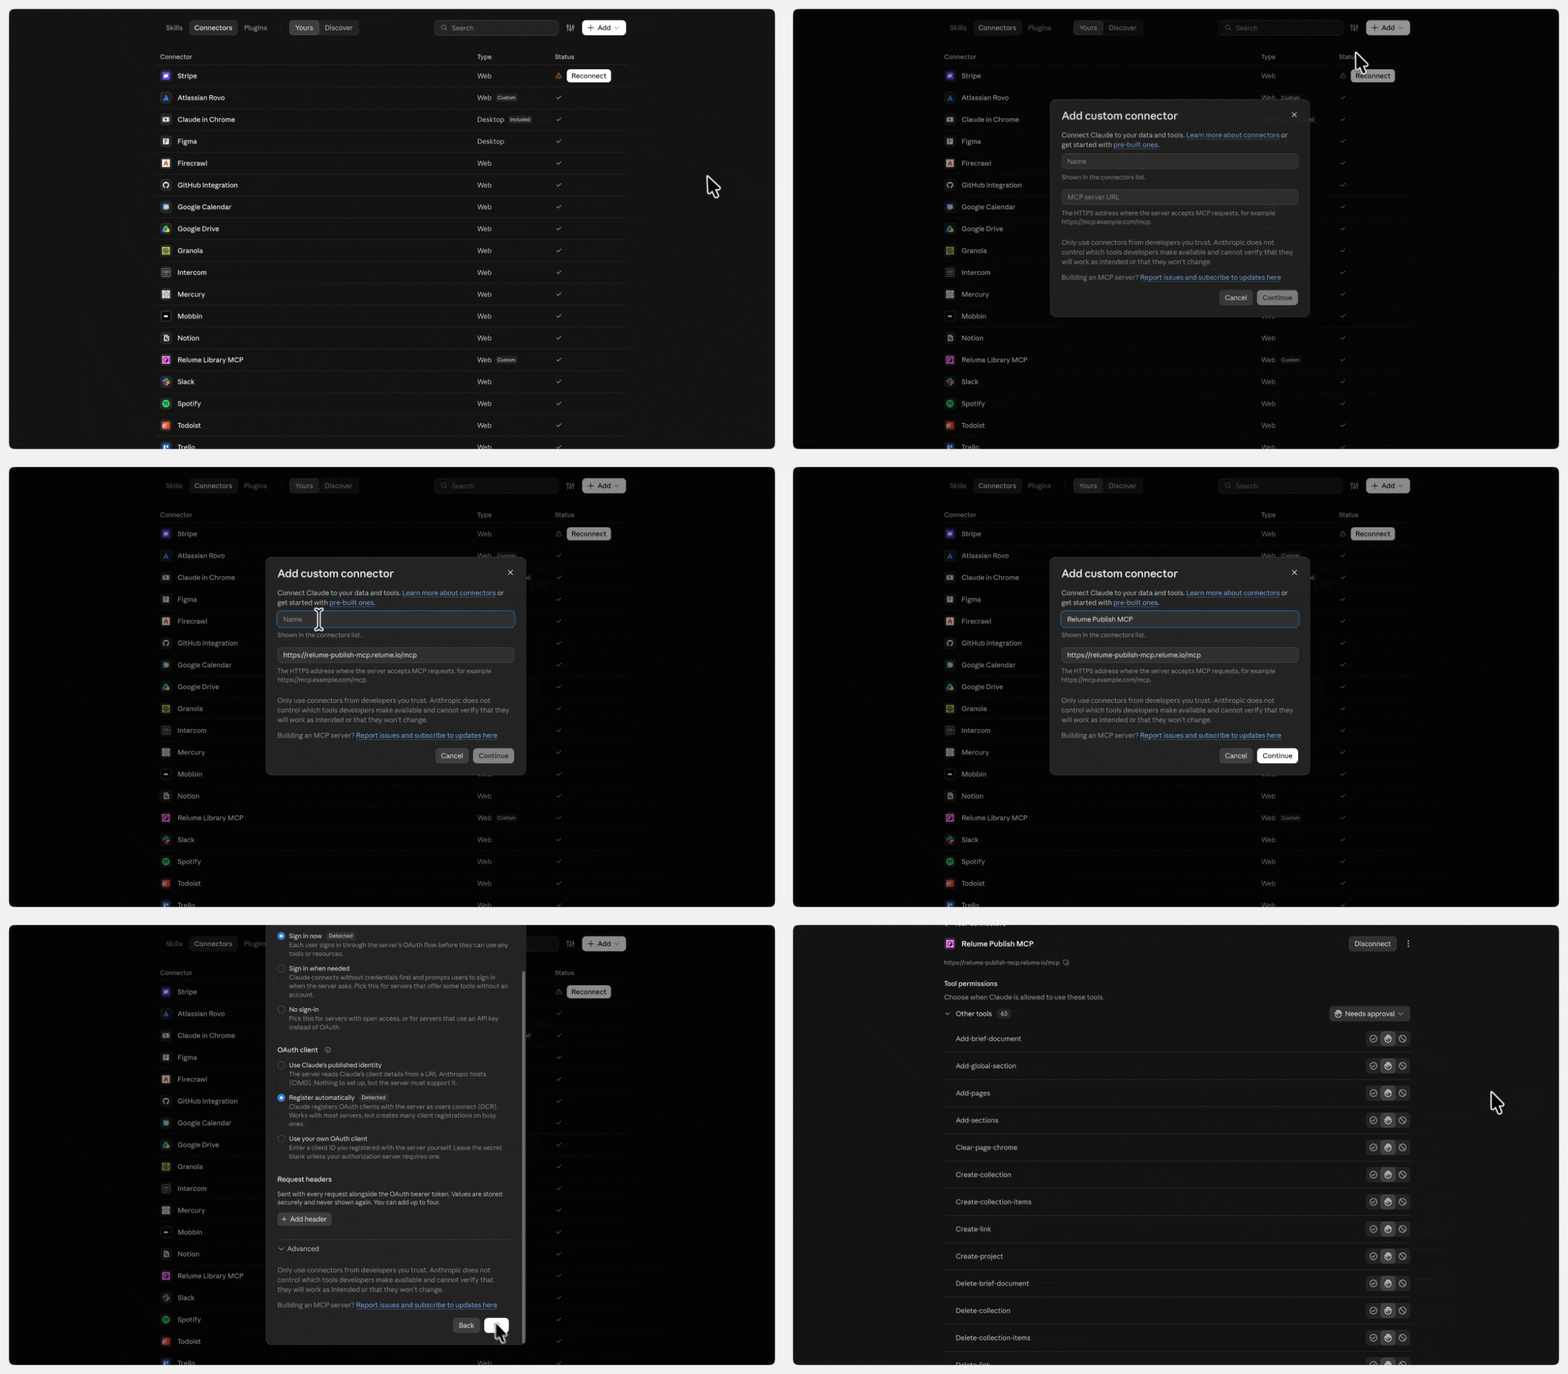
The Relume Publish MCP lets your AI read your Relume projects, and it serves the skill your AI follows to do the rebuild. Connect it in the same AI tool you used in Step 2.
Claude
- Go to Customize, then Connectors.
- Click Add custom connector.
- Enter Relume Publish as the name.
- Paste
https://relume-publish-mcp.relume.io/mcpinto the URL field. - Click Add.
- Click Connect.
- Sign in to your Relume account in the window that opens.
Claude Code with an API key
- Run
claude mcp add --transport http relume-publish https://relume-publish-mcp.relume.io/mcpin your terminal. - Type
/mcpin Claude Code. - Select relume-publish.
- Choose Authenticate.
- Sign in to your Relume account in the browser window that opens.
For ChatGPT, Codex and other tools, follow How to connect the Relume Publish MCP.
Step 4: Hand this project to your AI
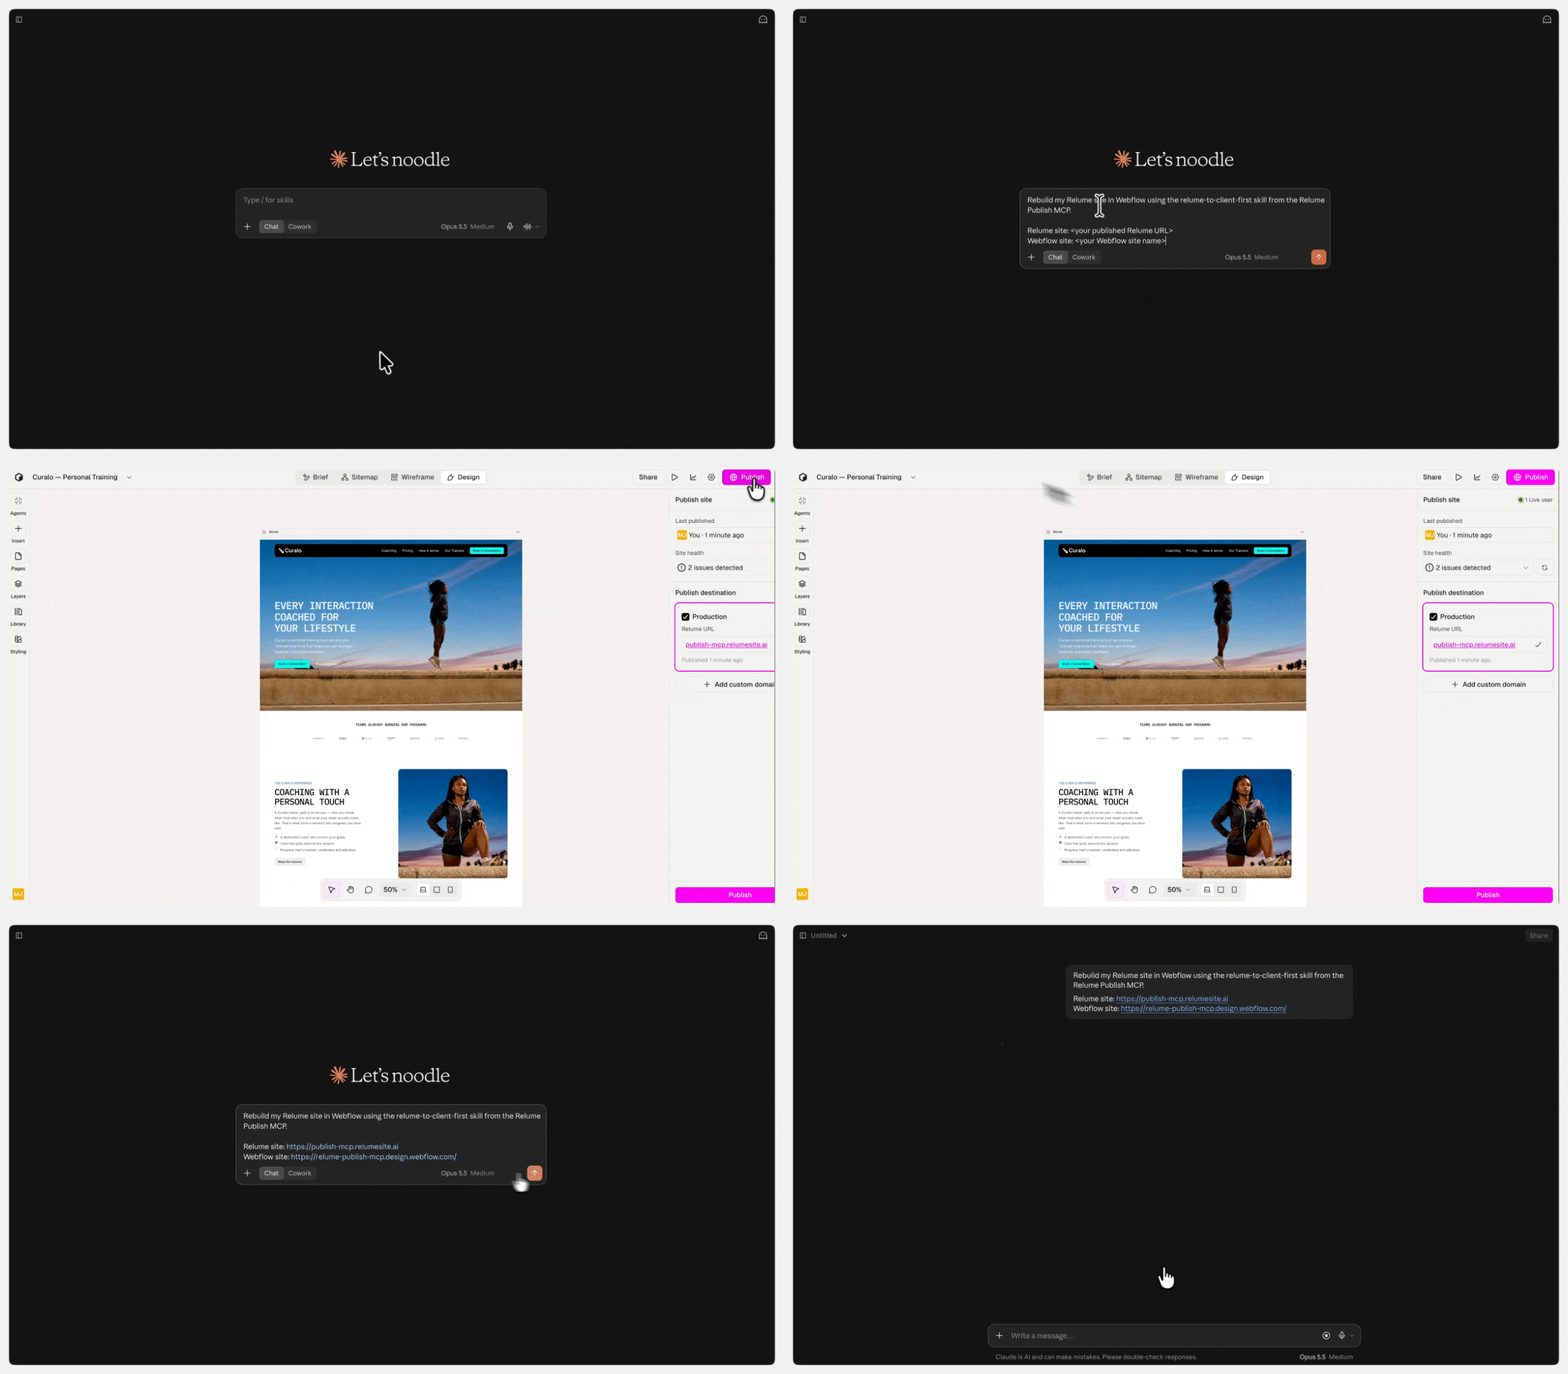
Publish first: your AI rebuilds from the live site, not from the Relume editor. Once both MCPs are connected, you share your project's link and your Webflow site's name, and the skill does the rest.
Note: Keep the Designer tab active and visible for the whole run, and don't minimize its window. Browsers put background tabs to sleep, which stalls the rebuild. If you use Chrome, see the tips below to keep the tab awake.
- Publish your Relume project, if you haven't already. To learn how, see Publishing and Hosting Your Site in Relume Publish.
- Open your new Webflow site in the Webflow Designer, in its own browser window.
- Copy the prompt below into a new chat in the AI tool you connected.
- Paste your Relume project's link after Relume project:. Copy it from your browser's address bar while the project is open in Relume.
- Enter your Webflow site's name after Webflow site:.
- Send the message.
- Check the Webflow site your AI names in its first reply. If it's the wrong site, stop the run and send the right site name.
Here's the prompt:
Rebuild my Relume project in Webflow: read webflow/SKILL.md from the Relume Publish MCP with get-skill, and follow it.
Relume project:
Webflow site:
From there, your AI reads your site through the Relume Publish MCP, plans each section the Client-First way and builds page by page without stopping for approval. At the end, it publishes once to your site's webflow.io address. Allow around 30 minutes for the home page, and longer for a website with multiple pages.
Step 5: Read the report and tidy up
When the run ends, your AI gives you a report. It lists every decision it made, anything it couldn't match exactly, and the follow-ups to do by hand. The most common follow-ups are:
- Adding your site's fonts in Webflow under Site settings, then Fonts
- Checking the mobile menu at tablet width
- Setting any form field names, placeholders or dropdown options the report lists as missing
- Swapping placeholder links and the logo
- Read the report from start to finish.
- Open your site's webflow.io address to see the rebuild.
- Work through each follow-up in the Webflow Designer.
Tips & Best Practices
Tip: Start the run when you can leave the Designer window alone for the better part of an hour. Switching tabs or minimizing the window is the most common reason a run stalls.
Tip: Stop Chrome from putting the Designer tab to sleep. Go to Settings, then Performance. Under Memory Saver, find Always keep these sites active, click Add and enter webflow.com.
Tip: When you spot something wrong after the run, tell your AI the page, the section (such as the hero on the About page) and what's wrong. Specific locations get fixed faster than general descriptions.
Tip: Get the rebuild matching first, then ask for changes. Mixing a rebuild and a redesign in one request makes both harder to check.
Need Support?
Join Our Community
Learn from fellow Lumers or showcase your work with our community of 10k+ members.
Get Support
We've got your back. Get your questions answered.
We typically reply in 24 hours or less.

